 Cutting Out Hair in Photoshop CS5: Photoshop CS5 comes with some exciting tools for designers, one of them that stand out is the new Refine Edge tool. It really helps when cutting out an object from a background especially when it involves human hair or any type of fur that is troublesome and can be tricky to achieve a realistic look. With Photoshop CS5 it is now possible to achieve the task very easily. Here are a couple techniques you can use on images especially those those with varied background tones, the results takes just a few mouse clicks. In this tutorial we will be replacing a dull background with a very cool sunset, Check it out!
Final Image
Resource
- sunbathing 2 from Stock.xchng
- Sunset from Astoria, Queens from Stock.xchng
[sociallocker]
Step 1
Open the sunbathing 2 from Stock.xchng, then crop it down to about 24×24 inches, removing the majority of the sky.

Step 2
Use the Quick Selection Tool, to do a rough selection of the girl. Make the brush size about 37 pixels in diameter at 100% hardness. brush over the image of the girl to do the quick selection.

[sam id=3 codes=’false’]
Step 3
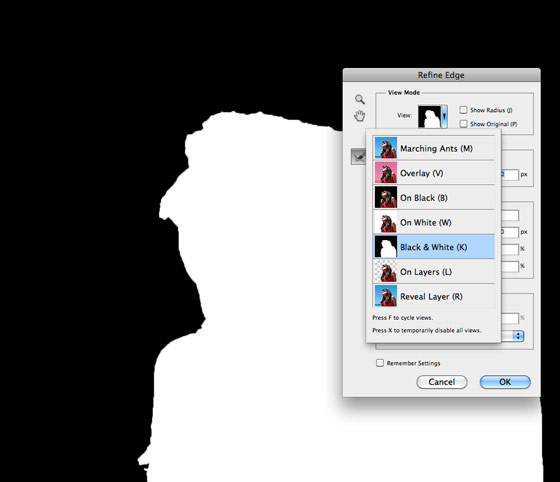
Now use the new Refine Edge tools in Photoshop CS5 to help us out. Click on the Refine Edge button.

The first thing you should do is decide which “View Mode” you want to work with, this will all depend on the image you are working on. With this particular image we want to see the outline of the hair, so go ahead and set the View Mode to Black and White, this will give us a nice mask.

Step 4
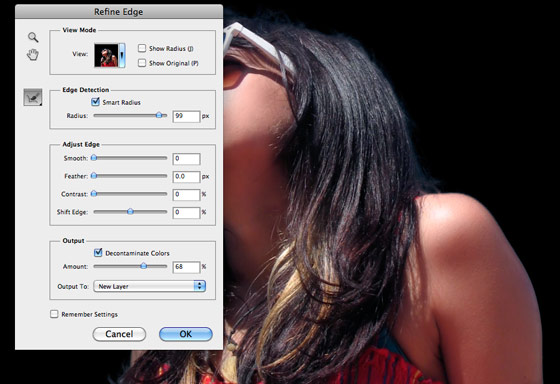
Set the Edge Detection to Smart Radius, then bump the Radius up to 99.0%

[sam id=3 codes=’false’]
Step 5
Change the View Mode to Black, you will notice that the model has some blue from the sky in her hair and on the edges of her skin.

Step 6
Turn on Decontaminate Colors and set the amount to 68%

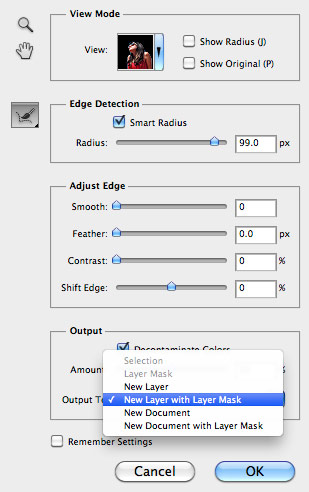
Tweak your settings by switching back and forth between view modes. When you are satisfied, set your Output to New Layer With Mask. Then press OK.

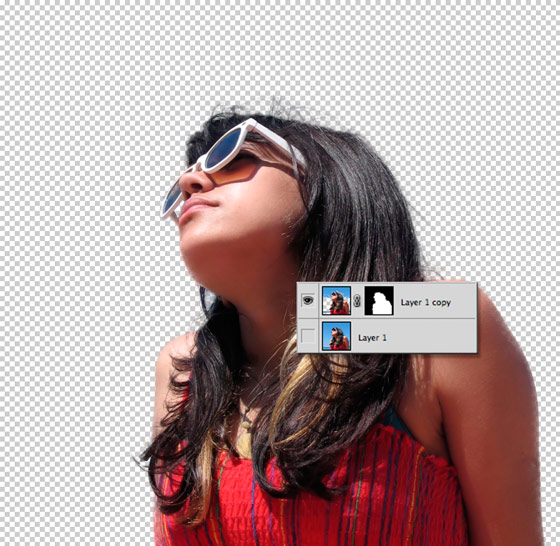
You will notice that Photoshop automatically created a new layer with a mask and turned off your original image layer.

Step 7
Now open the Sunset from Astoria, Queens image from Stock.xchng, copy and paste the image below the new Mask Layer (layer with the girl). See final Image below.
Final Image
Conclusion
As you can see the new Refine Edge tool, is a nice addition to Photoshop, it really help to speed up the design process with really great results, it is not a perfect tool for every situation, but it is great to have for those difficult and time consuming projects. Play around with the other options and try experimenting with other objects and see what kind of results you get.
 [/sociallocker]


61 thoughts on “New Techniques for Cutting Out Hair in Photoshop CS5”
yes very nice tips.
awesome !! thank you for sharing 🙂 😀
After reading multiple tutorials, this was by far the most concise and well written with good screenshots of each step. Thanks very much!
wow.. cool..i love it so much… 🙂
visit
how to copy and paste ?at the last step ?
Thanks for the great tutorial, easy to follow along and very informative!
Awsome! way better than the usual extract tool. Thanks alot:)
Thank you so much for this tutorial. I am a relative newbie to Photoshop and this is the first tutorial that I have found that actually made sense to me.
You are welcome Paula 🙂 Tnx
Nice, cool. That is great!
Hey.
I am an aspiring graphic designer, and I have always had a tough time working with hair.
But with this technique, it seems to be so much easier! 🙂
This requires minimal repair of the hair details as compared to the technique they added in CS3(or was it CS4..?) that was supposed to do this.
I thank you so much for this tutorial, it has helped me great deals already 🙂
Great…. super
Cool that is great! > _ <
Thanks for your contribution! 🙂
wow this was great! thanks so much for this tip!
Thanks, this made this task so simple. I received CS5 for Christmas and have not really explored its new tools.
Thanks so much for sharing your knowledge! It was exactly what I was looking for.
You are welcome, happy you found the tut useful 🙂
Great tutorial. This kind of article really helps. Thanks for the input.
Steve
Good tutorial… thanks…!!!
This technique works great most of the time, however if the background has a lot going on it… it really does not work so hot.
Yes, the tool is not meant for every situation, but it is a great addition to the tool-set in Photoshop 😉
Thanks, very simple and useful tool. I am curious, did you notice the girl’s corsage right side fades away on the final image? we are able to see the background buildings through it… It happened also on my final image after taking the tut.
How would you correct this? By tweaking the settings until the problem is solved or by hand, maybe cloning it back from the original image?
Thank you for a great tutorial!
There are some tools in the Refine Edge dialog box that could paint back the mask and fix that problem, they are the 1. Refine Radius Tool and 2.Erase Refinements tool. I did not experiment with them as yet, my best bet would be to cloning it back in.
its really nice trick…..very helping and time saving for the designers in cutting images smoothly and smartly…good tutorial….
I am a designer.
I facing lot of problems in to cut the hair form background..
this tip is very nice…..
Great but how about telling us how to place the image into the layer. With actual instructions not just repeating what a a lot of people can’t seem to understand
Hi jienchenswordsman, I do not explain things like “layers” in the tutorials, because if I spend time explaining small details like that, then the tutorials would be very, very long. You can find tutorials about layers by doing a simple Google search. Here is a nice layers tutorial: http://psd.tutsplus.com/tutorials/tools-tips/photoshop-layers/
Thanks for posting this tutorial, is great!
I knew i will eva love photography. You are too great.
I just started using Photoshop, so this tutorial was very helpful. There is just one thing I didn’t understand tho. In step 7 I can open the background picture but how do you drag it to the layer mask? Any help would be greatly appreciated.
Hi Andrew, thanks for the question, I changed the wording in step seven to be clearer
7. Now open and place the Sunset from Astoria, Queens image from Stock.xchng, below the Mask Layer (Layer with the girl).
Basically you are just placing the sunset image behind the girl….Hope that helps 🙂
I am really sorry, I couldn’t do Step 7 which said,
“Now open and drag the Sunset from Astoria, Queens image from Stock.xchng, and place it below the Mask Layer.”
Sorry I’m just a beginner so if you could explain in detail I’ll really appreciate it.
Thanks in advance 🙂
Hi Eric, basically you are going to do this
1) Open the Sunset from Astoria, Queens image from Stock.xchng
2) Place the Sunset from Astoria, Queens image from Stock.xchng below the Mask layer. ( You can do this by just dragging the image from one document to the next or copy and paste)
cool man but tell me about other settings plzzzz 😀
Photoshop CS5 is flat-out AMAZING! Now I don’t have to install a third-party masking plug-in to make difficult selections easier, and if I want to cut a subject out from its background, it’s WAY easier!
Great Tutorial. Thanks works so nice.
great concise tutorial… thanks for this!
Good tut/technique for the hair, but the resulting image is so out-of-whack and doesn’t look right at all, because in original photo, she is sitting in bright sunlight, with sun shining directly on her face, and sunglasses… then you put a background that has her sitting there (still with sun shining directly on face) with a darkening sky and now the sun is setting behind her as well as shining brightly in front of her??? I think a better image should have been selected for background, and a little more thought to realism would make this tut much better.
The tutorial is not about recreating atmosphere, the background used it’s only generic, you can easily add a Fill layer if you want.
Tutorials are not supposed to create an overall outstanding outcome, they are supposed to teach new techniques to do /create new things. It’s like I would write a tut about shading on a human body drawn from scratch. Not only you would have to learn to shade, but you would also learn to draw the human body – muscles, proportions, pose, bones, skin tones.
I wish this tutorial worked with backgrounds that are have a lot going on…. Its really good for pictures with people in front of flat backgrounds…..
Anyone know of any ways to short cut the path tool when the background is not simply flat, but has a lot going on in it?
Yes. But it requires more work 🙂 Here’s what you have to do:
1. Identify the base colors from your background.
2. Duplicate the respective channels (preferably blue or green, since the skin does not have any of these tones)
3. Work on every channel till you turn them to white (or black).
4. CTRL+SHIFT+click them to load selections et.. voila!
You’ll have a really good selection of what you’re about to cut out 🙂
Takes longer, but it works.
useful tut, thanks!
It’s been a long wait for this. Good work Adobe.
wow this really new techniques for cutting out hair in photoshop . .thanks for sharing this tip, very helpful . .
Thanks for this tip…i found it very very helpful!
The “refine edges” feature is one of the most exciting features of PS CS5 and I’m sure that it will become one of the most used in tutorials.
Wow, that was incredibly easy.
In CS3, it would have been like this:
1. High pass filter to sharpen the hair.
2. Duplicate Blue channel
3. Make tons of adjustments to obtain a good contrast.
4. Cut out.
Rly tiresome!
Thx for post, it’s great!
That is so true Doink, Photoshop has come a long way 🙂
Wow, I never thought to use High Pass filter for that…
…and now it’s obsolete… 😛
“I’d like to love people, but they are so stupid”..
If you don’t know how to use available tools, don’t blame the program for that. CS3 had an awesome tool – Extract filter – that often did a better job than this so-called “new” CS5 fiture, if you knew how to use it.
Now, Adobe has removed that nice filter and substituted it with some crippy (or crappy?) tool, and more than that, restricting to add that old filter to their 64-bit version.
You’ve shown simple example, and people get a fake feeling that they have solution. istead of showing them the best way to solve difficult isolation problems.
it’s very constructive, congradulations!
Lovely tool. Nice tut. This is an easier way to get the job done – better than how I learned how to do it in school.
Wow…. That is the exact answer I was needing.
Do you live in Astoria? I do!
Nice tut. But.. its too easy to crop such high contrasted picture. What about cutting blond hair from pink, and bright backgrounds?
Thanks for the thought, but with every tool in Photoshop, they can only be used with certain types of projects. See my conclusion above…
“it is not a perfect tool for every situation, but it is great to have for those difficult and time consuming projects.”
I also gave a link where you can learn to do it the old fashioned way in my opening paragraph: link
Hi loswl,i didn’t understand the step 7…you told to open and place the Sunset from Astoria, Queens image from Stock.xchng, below the Mask Layer (Layer with the girl).but how do we do that…help!!!!!
As the word implies “layer” all you are doing is putting the image as the last layer, so that it is the background, it is not complicated at all. If you look at the .PSD file you will see.
how do we do it..
Here is a great tutorial that explains how to use layers in Photoshop, it is Photoshop basics, that is why I did not explain it in the tut, sorry about that,… http://www.tutorial9.net/photoshop/working-with-layers-in-photoshop/
You lost some hair details :D. But good tut anyway 😀
Amazing! thanks for the tip!
Happy you found it useful 🙂